- 14. UsingEventAggregator
- 15. FilteringEvents
- 16. RegionContext
- 17. BasicRegionNavigation
- 18. NavigationCallback
- 19. NavigationParticipation
- 20. NavigateToExistingViews
- 21. PassingParameters
- 22. ConfirmCancelNavigation
- 23. RegionMemberLifetime
- 24. NavigationJournal
- 29. InvokeCommandAction
- 最後に
- 参考
WPF + .NET Core (5以降は Core は省略される) で Prism を使ってみよう。
使用している Prism のバージョンは次のとおり:
- 8.1.97 (2021/05/25)
- GitHub - Prism Sample WPF
「Prism Full App (.NET Core) テンプレートを体験する」の記事も参考になると思います。
関連記事は以下:
14. UsingEventAggregator
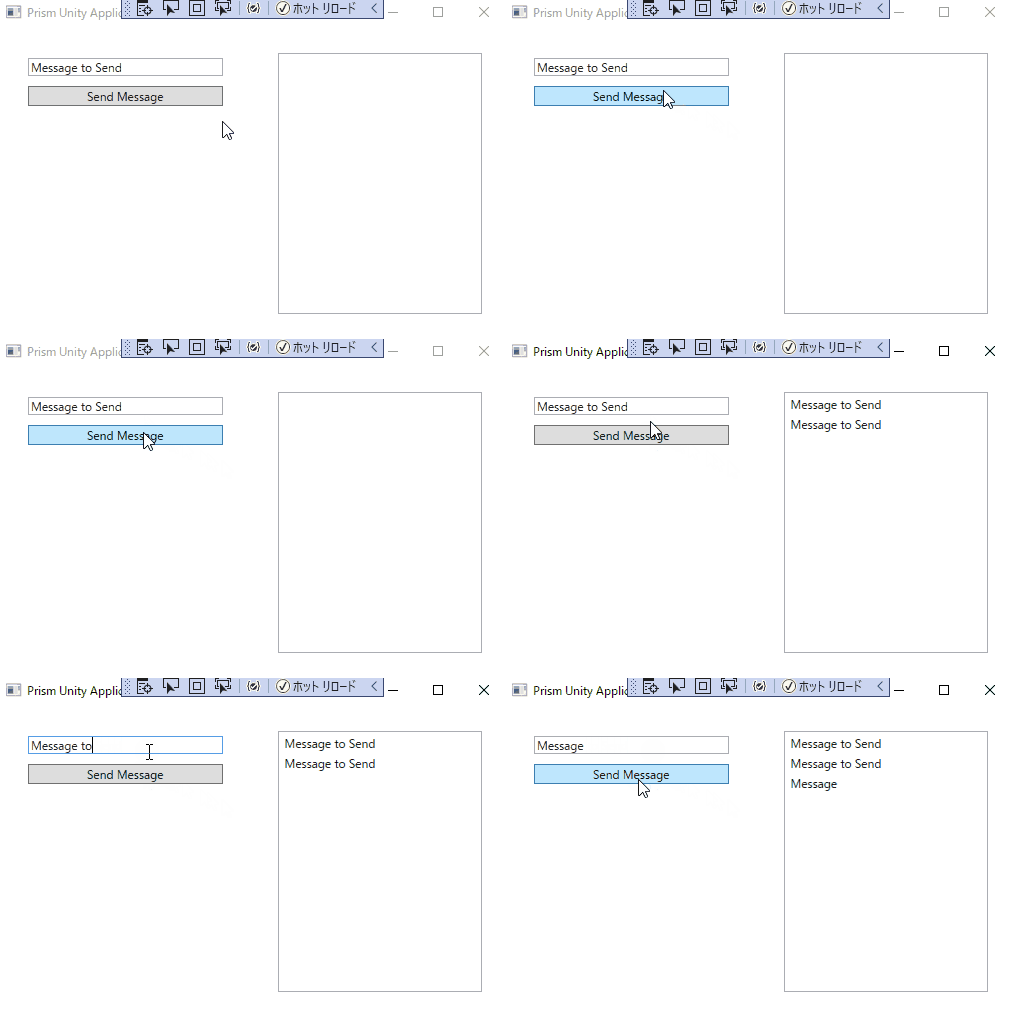
お互いに参照しあわないモジュールプロジェクト A, B 間でメッセージを送受信するサンプルです。

MainWindow のプロジェクトは何もロジックを持ちません。なので無視していい。
Core プロジェクトは、UsingCompositeCommands のように継承クラスを持ちますが、特になんのメソッドもプロパティも持ちません。PubSubEvent はインターフェースではないから、継承した時点で機能が付与されています。
public class MessageSentEvent : PubSubEvent<string>
{
}
サンプルを見ればわかりますが、ModuleA が ModuleB にテキストデータを送るという関係になるので、先に 受け取り側の ModuleB から確認してみます。
ModuleBModule クラスは、RegionManager に View を割り当てているだけなので、シンプルなものです。View も特に新しく仕込まれるものはないので、ViewModel だけチェックすればいいです。
public class MessageListViewModel : BindableBase
{
    IEventAggregator _ea;

    private ObservableCollection<string> _messages;
    public ObservableCollection<string> Messages
    {
        get { return _messages; }
        set { SetProperty(ref _messages, value); }
    }

    public MessageListViewModel(IEventAggregator ea)
    {
        _ea = ea;
        Messages = new ObservableCollection<string>();

        _ea.GetEvent<MessageSentEvent>().Subscribe(MessageReceived);
    }

    private void MessageReceived(string message)
    {
        Messages.Add(message);
    }
}
IEventAggregator を DI から受け取っていますね。これをクラス変数として持ち、MessageReceived メソッドで待ち受けるといった設定です。シンプルです。
逆に、データを送る ModuleA 側を確認します:
public class MessageViewModel : BindableBase
{
    IEventAggregator _ea;

    private string _message = "Message to Send";
    public string Message
    {
        get { return _message; }
        set { SetProperty(ref _message, value); }
    }

    public DelegateCommand SendMessageCommand { get; private set; }

    public MessageViewModel(IEventAggregator ea)
    {
        _ea = ea;
        SendMessageCommand = new DelegateCommand(SendMessage);
    }

    private void SendMessage()
    {
        _ea.GetEvent<MessageSentEvent>().Publish(Message);
    }
}
ボタンを押下した際に実行されるコマンドは SendMessageCommand です。SendMessageCommand の中で、IEventAggregator から実体の MessageSentEvent を受け取り、Publish してメッセージを送っています。
IEventAggregator を通じて、プロジェクト間 (ModuleA to ModuleB) のデータの受け渡しを疎結合にしていることがわかりました。
Prism 全体を通じて、DI を活用したプロジェクト間のデータ連携が目立つように思いました。
15. FilteringEvents
UsingEventAggregator で受け渡しする際にフィルターを設定するサンプルです。
public class MessageListViewModel : BindableBase
{
    IEventAggregator _ea;

    private ObservableCollection<string> _messages;
    public ObservableCollection<string> Messages
    {
        get { return _messages; }
        set { SetProperty(ref _messages, value); }
    }

    public MessageListViewModel(IEventAggregator ea)
    {
        _ea = ea;
        Messages = new ObservableCollection<string>();

        _ea.GetEvent<MessageSentEvent>().Subscribe(
            MessageReceived,
            ThreadOption.PublisherThread,
            false,
            (filter) => filter.Contains("Brian"));
    }

    private void MessageReceived(string message)
    {
        Messages.Add(message);
    }
}
ModuleB のデータを受け取る部分、Subscribe の箇所で filter を指定しています。これだとテキストに Brian が含まれていないと MessageReceived メソッドが実行されません。
UniRx にしてもこの種のフィルターはよくあるやつなので、なんとなくわかる。
16. RegionContext
RegionContext は、2. Region の機能をもう少し掘り下げた機能になる。
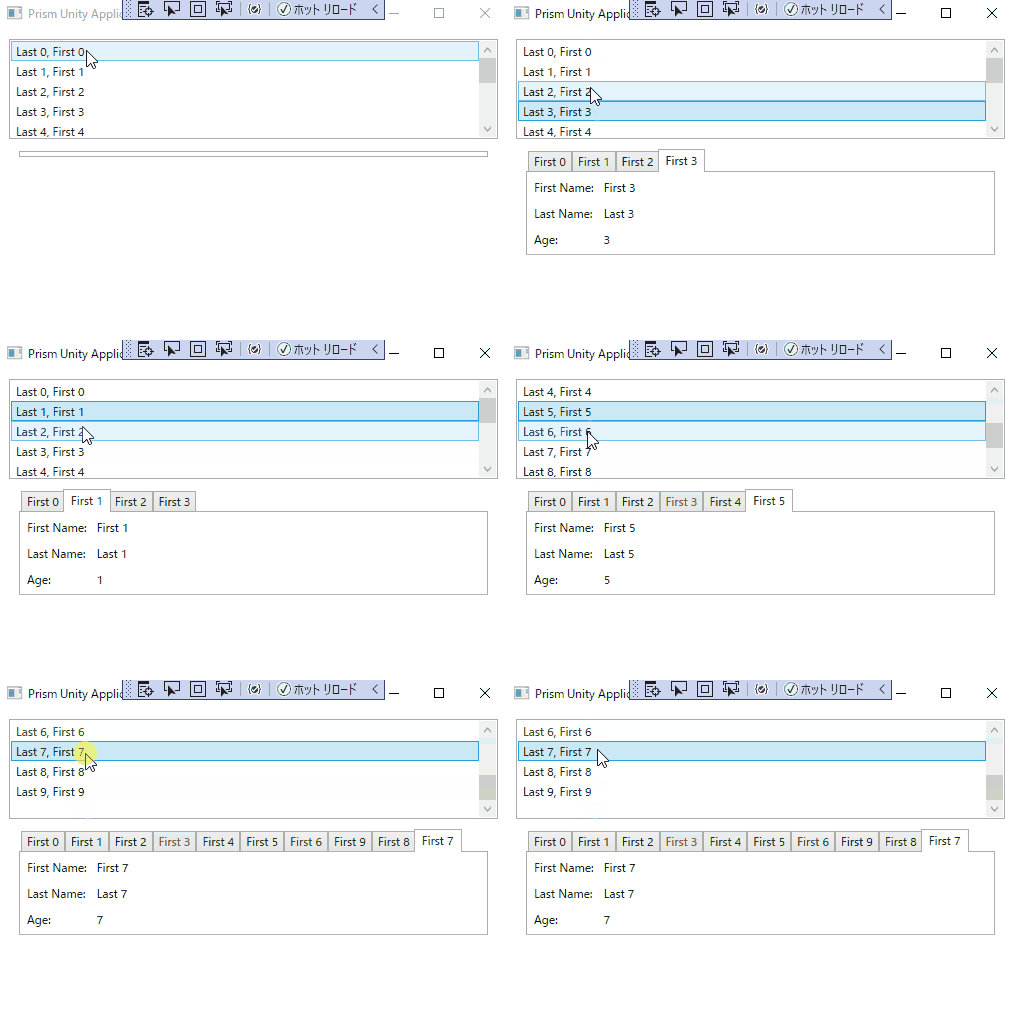
親 Window の XAML はいつもと同じ。でも、そこに割り当てるコントロール PersonList の中でも RegionManager が姿を表していて、かつ、RegionContext で DataContext に割り当てるオブジェクトを指定しています。(これだとリストの選択アイテム)
<Window x:Class="RegionContext.Views.MainWindow"
        xmlns="http://schemas.microsoft.com/winfx/2006/xaml/presentation"
        xmlns:x="http://schemas.microsoft.com/winfx/2006/xaml"
        xmlns:prism="http://prismlibrary.com/"
        prism:ViewModelLocator.AutoWireViewModel="True"
        Title="{Binding Title}" Height="350" Width="525">
    <Grid>
        <ContentControl prism:RegionManager.RegionName="ContentRegion" />
    </Grid>
</Window>
<UserControl x:Class="ModuleA.Views.PersonList"
             xmlns="http://schemas.microsoft.com/winfx/2006/xaml/presentation"
             xmlns:x="http://schemas.microsoft.com/winfx/2006/xaml"
             xmlns:prism="http://prismlibrary.com/"
             prism:ViewModelLocator.AutoWireViewModel="True">
    <Grid x:Name="LayoutRoot" Background="White" Margin="10">
        <Grid.RowDefinitions>
            <RowDefinition Height="100"/>
            <RowDefinition Height="Auto"/>
        </Grid.RowDefinitions>

        <ListBox x:Name="_listOfPeople" ItemsSource="{Binding People}"/>
        <ContentControl Grid.Row="1" Margin="10"
                        prism:RegionManager.RegionName="PersonDetailsRegion"
                        prism:RegionManager.RegionContext="{Binding SelectedItem, ElementName=_listOfPeople}"/>
    </Grid>
</UserControl>
このリージョンごとの設定は以下のとおり ModuleAModule になる。
public class ModuleAModule : IModule
{
    public void OnInitialized(IContainerProvider containerProvider)
    {
        var regionManager = containerProvider.Resolve<IRegionManager>();
        regionManager.RegisterViewWithRegion("ContentRegion", typeof(PersonList));
        regionManager.RegisterViewWithRegion("PersonDetailsRegion", typeof(PersonDetail));
    }
}
SelectedItem の正体は、ObservableCollection<Person> People の単体 Person です。これが PersonDetailViewModel の ViewModel に設定されています。
これを受け取る部分は PersonDetail.xaml.cs のコード:
public partial class PersonDetail : UserControl
{
    public PersonDetail()
    {
        InitializeComponent();
        RegionContext.GetObservableContext(this).PropertyChanged += PersonDetail_PropertyChanged;
    }

    private void PersonDetail_PropertyChanged(object sender, System.ComponentModel.PropertyChangedEventArgs e)
    {
        var context = (ObservableObject<object>)sender;
        var selectedPerson = (Person)context.Value;
        (DataContext as PersonDetailViewModel).SelectedPerson = selectedPerson;
    }
}
これで PersonDetailViewModel が DataContext のデータを SelectedPerson として受け取ることを実現しています。
これは正直、悩ましい DataContext コンバーターにも思いました。VM と V は疎結合になっていないのがわかると思います。(as でクラスの要素を特定していますし)、そもそもロジック部分がバラついてしまっていて、ベターなコードとはいいづらいと(個人的に)思います。
RegionContext.GetObservableContext(引数) の部分で view を引数に渡す必要があるため、基本的に View に加筆するコードになります。ただ、これでいいなら ViewModel で View の存在を知っているのと、どのくらいの差があるのかは悩ましい。
ViewModel のコードだけ、疎結合の状態になっているのが特徴だと思いました。
View は基本的にコードを持たないようなところがあるため、慣れるまで違和感があると思います。
17. BasicRegionNavigation
ボタンを押下すると "ViewA" と "ViewB" というテキストを VM にコマンドで送り、コマンドの中で RequestNavigate を使って、リージョンを入れ替えている。
private void Navigate(string navigatePath)
{
    if (navigatePath != null)
        _regionManager.RequestNavigate("ContentRegion", navigatePath);
}
navigatePath に ViewA や ViewB が入ってくる。
このテキストで名前を解決しているのは ModuleAModule の部分。
public void RegisterTypes(IContainerRegistry containerRegistry)
{
    containerRegistry.RegisterForNavigation<ViewA>();
    containerRegistry.RegisterForNavigation<ViewB>();
}
登録されていない名前を ViewC を RequestNavigate で選択してもリージョンは切り替わらない。(ViewA が表示されているなら表示されたまま)
疎結合を図る仕組みが色々提供されている印象です。でも、テキストでの繋がりになるということは、繋がりが弱すぎて検索もしづらいし、どういう設計かを忘れると困ることもありそう。要注意。
18. NavigationCallback
TextBox を表示している部分が Callback の機能。つまり、BasicRegionNavigation の機能にあるおまけの部分。
private void Navigate(string navigatePath)
{
    if (navigatePath != null)
        _regionManager.RequestNavigate("ContentRegion", navigatePath, NavigationComplete);
}

private void NavigationComplete(NavigationResult result)
{
    System.Windows.MessageBox.Show(String.Format("Navigation to {0} complete. ", result.Context.Uri));
}
RequestNavigate メソッドの引数がひとつ増えている。これがそのまま Callback メソッドという関係になっている。
19. NavigationParticipation
Navigation + Participation というのは、意味がわかりづらいところがある。Navigation 機能に参加する際に発生するアレコレという内容です。
具体的には ViewModel が継承する INavigationAware インターフェースの定義するメソッド3種類を指しています。
- bool IsNavigationTarget(NavigationContext navigationContext);
- void OnNavigatedFrom(NavigationContext navigationContext);
- void OnNavigatedTo(NavigationContext navigationContext);
Navigation を実行した際に、追加実行することができるメソッドを実装することができる。(自動実行される)
OnNavigatedTo メソッドは、必ず発生します。表示する View で発生します。ViewA から ViewB に移動する際は、ViewB の OnNavigatedTo メソッドを実行します。(ViewA は発生しません)
OnNavigatedFrom メソッドは、初回には実行されません。表示している View から別の View に移動する際に発生します。ViewA から ViewB に移動する際は、ViewA の OnNavigatedFrom メソッドを実行します。(ViewB は発生しません)
IsNavigationTarget メソッドは、NavigateToExistingViews の内容です。
20. NavigateToExistingViews
初回にボタンをクリックしても実行されません。2回目以降は実行され、true を返却すると同じビューを更新する。(PageViews のカウンターの数を加算する)でも、false を返却すると別のビューであると判断して、カウンターは「1」で異なるインスタンスの View+ViewModel が生成される。
true のときは存在している(履歴に持つ)View に移動して、false のときは新しい View に移動する、くらいの認識になると思います。
public bool IsNavigationTarget(NavigationContext navigationContext)
{
    return PageViews / 3 != 1;
}
PageViews のカウンターは、1,2,3の次はまた「1」に戻る。この動きは内部的には別のインスタンスが生成されていて、Navigate の機能はコレクションとして履歴を保管している。

21. PassingParameters
コンストラクターの中で、PersonSelectedCommand コマンドを作成して、コマンドが実行されたときに NavigationParameters を作成、このパラメーターオブジェクトに "person" というパラメーターを追加して、RequestNavigate に渡している。

public PersonListViewModel(IRegionManager regionManager)
{
    _regionManager = regionManager;

    PersonSelectedCommand = new DelegateCommand<Person>(PersonSelected);
    CreatePeople();
}

private void PersonSelected(Person person)
{
    var parameters = new NavigationParameters();
    parameters.Add("person", person);

    if (person != null)
        _regionManager.RequestNavigate("PersonDetailsRegion", "PersonDetail", parameters);
}
ListBox のアイテムを追加する、または、既存のアイテムを再選択するイベントは以下の NavigateToExistingViews の機能を使っている。
先に OnNavigatedTo が実行されたあとに(SelectedPerson の初期化)をして、IsNavigationTarget が実行されます。
public void OnNavigatedTo(NavigationContext navigationContext)
{
    var person = navigationContext.Parameters["person"] as Person;
    if (person != null)
        SelectedPerson = person;
}

public bool IsNavigationTarget(NavigationContext navigationContext)
{
    var person = navigationContext.Parameters["person"] as Person;

    if (person != null)
        return SelectedPerson != null && SelectedPerson.LastName == person.LastName;
    else
        return true;
}
true になる条件が、すこし難しい:
- NavigationParameters が存在しないときは true(View の新規作成)
- person が存在するとき
- SelectedPerson が初期化されており、かつ、名前が一致するとき true
基本的には true になるので、過去の View を再利用する。
22. ConfirmCancelNavigation
IConfirmNavigationRequest インターフェースが定義するメソッド。IConfirmNavigationRequest は INavigationAware を継承している。
public void ConfirmNavigationRequest(NavigationContext navigationContext, Action<bool> continuationCallback)
{
    bool result = true;

    if (MessageBox.Show("Do you to navigate?", "Navigate?", MessageBoxButton.YesNo) == MessageBoxResult.No)
        result = false;

    continuationCallback(result);
}
continuationCallback(bool) に true を渡すと、Navigation の画面遷移が発生する。false だとキャンセルされる。ConfirmNavigationRequest の名前のとおりなので、目的がはっきりしている。確認することこそが適格だと思う。
23. RegionMemberLifetime
IRegionMemberLifetime インターフェースの定義する機能のこと。KeepAlive プロパティを実装している。
- KeepAlive
public bool KeepAlive
{
    get
    {
        return true;
    }
}
KeepAlive を false にすると、IsNavigationTarget の返り値が false なので、必ず新しい View+ViewModel で画面を生成します。このとき、前回使用した View+ViewModel を破棄するかしないかを決定することができます。
デフォルト値は true なので、過去の View が残っているため、ViewB はボタンを押下するたび MainWindow.xaml の Views に表示されるコレクションが増えていく。ViewA は押下するたびに、前回のデータを削除してから追加している。
24. NavigationJournal
画面をブラウザーのようにページを切り替える機能を提供する。
IRegionNavigationJournal _journal;

public PersonListViewModel(IRegionManager regionManager)
{
    PersonSelectedCommand = new DelegateCommand<Person>(PersonSelected);
    GoForwardCommand = new DelegateCommand(GoForward, CanGoForward);
}

private void PersonSelected(Person person)
{
    var parameters = new NavigationParameters();

    parameters.Add("person", person);

    if (person != null)
    {
        _regionManager.RequestNavigate("ContentRegion", "PersonDetail", parameters);
    }
}

public void OnNavigatedTo(NavigationContext navigationContext)
{
    _journal = navigationContext.NavigationService.Journal;
}

private void GoForward()
{
    _journal.GoForward();
}

private bool CanGoForward()
{
    return _journal != null && _journal.CanGoForward;
}

private void GoBack()
{
    _journal.GoBack();
}
画面を移動したとき (OnNavigatedTo) に _journal を記録している。ListBox の選択を切り替えた時の遷移は GoForward を利用せず、ボタン押下時にだけ利用している。
以下のコマンドは初回表示したときに限ると意味はない:
- GoForwardCommand.RaiseCanExecuteChanged();
RaiseCanExecuteChanged() を入れることで、GoForward() を利用するボタンを有効にします。初回実行時は、CanGoForward() が false にしかならないので GoForward() が使えません。
GoBack() で戻った時に CanGoForward() を満たすことができるので、RaiseCanExecuteChanged() を実行することで、Forward ボタンが有効になります。

具体的な機能なので「このように動かすもの」として利用します。_journal の操作は各画面であまり変わらない可能性が高いので Full App であれば、VM の基底として Core に abstract などの抽象・基底クラスを作成しておいてもよいと思いました。(MonoBehavior とも近い印象)
注意:25 ~ 28 は現在、サンプルがなくなっているようです。17 Nov 2020 のコミットで古い双方向性サンプルを削除しているみたいなので、これらは無視します。
commit log: removed old interactivity samples
29. InvokeCommandAction
InvokeCommandAction は、View の中のコントロールで発生したイベントに対応してコマンドを実行する必要があるときに便利です。
InvokeCommandAction is useful when you need to invoke a command in response to an event raised by a control in the view.
サンプルでは、ListBox があり、アイテムが選択されたときに ViewModel にて対応するコマンドを実行します。
<Window xmlns:i="http://schemas.microsoft.com/xaml/behaviors"
        xmlns:prism="http://prismlibrary.com/"
        prism:ViewModelLocator.AutoWireViewModel="True">

<ListBox Grid.Row="1" Margin="5" ItemsSource="{Binding Items}" SelectionMode="Single">
    <i:Interaction.Triggers>
        <!-- This event trigger will execute the action when the corresponding event is raised by the ListBox. -->
        <i:EventTrigger EventName="SelectionChanged">
            <!-- This action will invoke the selected command in the view model and pass the parameters of the event to it. -->
            <prism:InvokeCommandAction Command="{Binding SelectedCommand}" TriggerParameterPath="AddedItems" />
        </i:EventTrigger>
    </i:Interaction.Triggers>
</ListBox>

</Window>
i: 名前空間は prism の機能とは別です。InvokeCommandAction は、i インタラクティブ系機能を使っているイベントトリガーです。ListBox のイベント SelectionChanged がイベント実行条件で、InvokeCommandAction は AddedItems というプロパティを SelectedCommand に渡しています。
発生するイベントのプロパティを選択して取得しています。TriggerParameterPath を空欄にすると、SelectionChangedEventArgs そのものを引数として受け取ることができます。
基本的には View と ViewModel は疎結合にしたい意図があるため、必要なパラメーターを決めて View から送っているという関係になります。
最後に
以上で、サンプルをすべて動かしたことになります。おつかれさまでした。
使い方をある程度理解する上では、かなり要点がまとまっているものだったと思います。個人的なプロジェクトに応用するうえではもう少し咀嚼しないと難しいものもありましたが、具体的なロジックもあるので、テストしておいて損はないと思います。
ライブラリーを使う前にまとまった時間を投資しないとダメなんだな、という典型。


