
Prism を利用するプロジェクトで子ウィンドウ(ダイアログ)を表示する方法は、バージョンの進化によって変化してきているようです。
現在(下記のバージョン記載)では、ダイアログの機能が一番手早く子ウィンドウを利用するための機能として候補に挙がります。
Prism
- Prism.Wpf 8.1.97
- Prism.Unity 8.1.97
App.xaml
とりあえずエントリーポイントから見ていく。
通常どおり、初期表示するウィンドウは MainWindow で、コンテナにポップアップする画面を RegisterDialog メソッドを通じて追加(Dialog1.xaml)します。
<prism:PrismApplication x:Class="PrismPopupDialogTest.App"
                        xmlns="http://schemas.microsoft.com/winfx/2006/xaml/presentation"
                        xmlns:x="http://schemas.microsoft.com/winfx/2006/xaml"
                        xmlns:prism="http://prismlibrary.com/"
                        xmlns:local="clr-namespace:PrismPopupDialogTest">
    <Application.Resources>

    </Application.Resources>
</prism:PrismApplication>
public partial class App
{
    protected override Window CreateShell() => Container.Resolve<MainWindow>();

    protected override void RegisterTypes(IContainerRegistry containerRegistry)
    {
        containerRegistry.RegisterDialog<Dialog1>();
    }

    protected override void OnInitialized()
    {
        base.OnInitialized();
    }
}
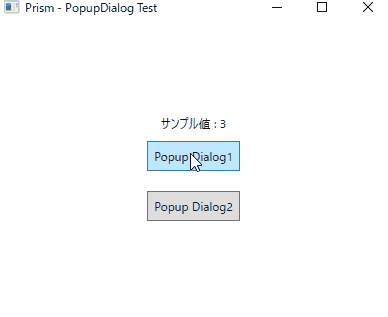
MainWindow (View + ViewModel)

サンプルにこの画面を作成した。2パターンのダイアログを表示することを目的にしています。
<Window x:Class="PrismPopupDialogTest.Views.MainWindow"
        xmlns="http://schemas.microsoft.com/winfx/2006/xaml/presentation"
        xmlns:x="http://schemas.microsoft.com/winfx/2006/xaml"
        xmlns:d="http://schemas.microsoft.com/expression/blend/2008"
        xmlns:mc="http://schemas.openxmlformats.org/markup-compatibility/2006"
        xmlns:prism="http://prismlibrary.com/"
        xmlns:v="clr-namespace:PrismPopupDialogTest.Views"
        xmlns:vm="clr-namespace:PrismPopupDialogTest.ViewModels"
        prism:ViewModelLocator.AutoWireViewModel="True"
        mc:Ignorable="d"
        d:DataContext="{d:DesignInstance vm:MainWindowViewModel}"
        Title="{Binding Title}" Height="300" Width="400">
    <StackPanel HorizontalAlignment="Center"
                VerticalAlignment="Center"
                Orientation="Vertical">
        <TextBlock HorizontalAlignment="Center"
                   Text="{Binding SampleValue, StringFormat=サンプル値 : {0}}" />
        <Button Margin="10" Padding="6"
                Content="Popup Dialog1"
                Command="{Binding PopupDialog1Command}" />
        <Button Margin="10" Padding="6"
                Content="Popup Dialog2"
                Command="{Binding PopupDialog2Command}" />
    </StackPanel>
</Window>
public class MainWindowViewModel : BindableBase
{
    private IDialogService _DialogService;
    private string _Title = "Prism - PopupDialog Test";

    public string Title
    {
        get => _Title;
        set => SetProperty(ref _Title, value);
    }

    private int _SampleValue = 3;

    public int SampleValue
    {
        get => _SampleValue;
        set => SetProperty(ref _SampleValue, value);
    }

    public DelegateCommand PopupDialog1Command { get; }
    public DelegateCommand PopupDialog2Command { get; }

    /// <summary>
    /// <see cref="MainWindowViewModel"/> クラスの新しいインスタンスを初期化します。
    /// </summary>
    public MainWindowViewModel(IDialogService dialogService)
    {
        _DialogService = dialogService;

        PopupDialog1Command = new (() =>
        {
            Debug.WriteLine($"{nameof(PopupDialog1Command)} called.");

            var parameters = new DialogParameters
            {
                { "key1", "send data1" },
                { "key2", "send data2" },
                { "key3", SampleValue },
            };

            _DialogService.ShowDialog("Dialog1", parameters, (results) =>
            {
                SampleValue = results.Parameters.GetValue<int>("key3");

                Debug.WriteLine($"Dialog1 result called.");
            });
        });

        PopupDialog2Command = new(() =>
        {
            Debug.WriteLine($"{nameof(PopupDialog2Command)} called.");

            var parameters = new DialogParameters
            {
                { "key1", "send data1" },
                { "key2", "send data2" },
                { "key3", SampleValue },
            };

            _DialogService.ShowDialog("Dialog2", parameters, (results) =>
            {
                SampleValue = results.Parameters.GetValue<int>("key3");

                Debug.WriteLine($"Dialog2 result called.");
            });
        });

    }
}
ポイントは、コンストラクターで IDialogService を受け取り、ShowDialog でダイアログを表示しています。この表示するダイアログは Window を継承するコントロールである必要はありません。UserControl でよいのです。
サンプルでは、
DialogParametersでダイアログにデータを送りだし、ダイアログを消したあと results で結果を受け取ります。データの送受信は Parameters を通しています。
Dialog1

とりあえず、シンプルにダイアログを表示してみます。ダイアログに利用する ViewModel は BindableBase の継承のほかにも IDialogAware インターフェースを継承します。
IDialogAware インターフェースは、次の5つを実装する必要があります。
- string Title { get; }
ダイアログのタイトル - event Action
RequestClose;
ダイアログを閉じるときのイベント - bool CanCloseDialog();
ダイアログを閉じることができるかを決める(通常は true でいい) - void OnDialogClosed();
ダイアログを閉じたときに実行されるイベント - void OnDialogOpened(IDialogParameters parameters);
ダイアログを開いたときに実行されるイベント(パラメーターはここで受け取る)
<UserControl x:Class="PrismPopupDialogTest.Views.Dialog1"
             xmlns="http://schemas.microsoft.com/winfx/2006/xaml/presentation"
             xmlns:x="http://schemas.microsoft.com/winfx/2006/xaml"
             xmlns:d="http://schemas.microsoft.com/expression/blend/2008"
             xmlns:mc="http://schemas.openxmlformats.org/markup-compatibility/2006"
             xmlns:prism="http://prismlibrary.com/"
             xmlns:v="clr-namespace:PrismPopupDialogTest.Views"
             xmlns:vm="clr-namespace:PrismPopupDialogTest.ViewModels"
             prism:ViewModelLocator.AutoWireViewModel="True"
             mc:Ignorable="d"
             d:DataContext="{d:DesignInstance vm:Dialog1ViewModel}"
             d:DesignHeight="200" d:DesignWidth="200"
             MinWidth="200" MinHeight="200">
    <StackPanel Orientation="Vertical"
                HorizontalAlignment="Center"
                VerticalAlignment="Center">
        <TextBlock Margin="10" Text="{Binding Sample1}" />
        <TextBlock Margin="10" Text="{Binding Sample2}" />
        <StackPanel Orientation="Horizontal"
                    HorizontalAlignment="Center">
            <Button Margin="10" Padding="6"
                    Content="↓"
                    Command="{Binding DownValueCommand}" />
            <TextBlock Margin="10"
                       VerticalAlignment="Center"
                       Text="{Binding Sample3}" />
            <Button Margin="10" Padding="6"
                    Content="↑"
                    Command="{Binding UpValueCommand}" />
        </StackPanel>
        <Button Margin="10" Padding="6"
                MinWidth="120"
                Content="Close"
                Command="{Binding CloseCommand}" />
    </StackPanel>
</UserControl>
public class Dialog1ViewModel : BindableBase, IDialogAware
{
    private string _Title = "Test Title";

    public event Action<IDialogResult> RequestClose;

    public string Title
    {
        get => _Title;
        set => SetProperty(ref _Title, value);
    }

    private string _Sample1;

    public string Sample1
    {
        get => _Sample1;
        set => SetProperty(ref _Sample1, value);
    }

    private string _Sample2;

    public string Sample2
    {
        get => _Sample2;
        set => SetProperty(ref _Sample2, value);
    }

    private int _Sample3;

    public int Sample3
    {
        get => _Sample3;
        set => SetProperty(ref _Sample3, value);
    }

    public DelegateCommand CloseCommand { get; }
    public DelegateCommand UpValueCommand { get; }
    public DelegateCommand DownValueCommand { get; }

    /// <summary>
    /// <see cref="Dialog1ViewModel"/> クラスの新しいインスタンスを初期化します。
    /// </summary>
    public Dialog1ViewModel()
    {
        CloseCommand = new (() =>
        {
            var result = new DialogResult();

            result.Parameters.Add("key3", Sample3);

            RequestClose?.Invoke(result);

            Debug.WriteLine($"{nameof(CloseCommand)} called.");
        });

        UpValueCommand = new (() =>
        {
            Sample3++;
        });

        DownValueCommand = new (() =>
        {
            Sample3--;
        });

    }

    public bool CanCloseDialog() => true;

    public void OnDialogOpened(IDialogParameters parameters)
    {
        Sample1 =  parameters.GetValue<string>("key1") ?? "error";
        Sample2 =  parameters.GetValue<string>("key2") ?? "error";
        Sample3 =  parameters.GetValue<int>("key3");

        Debug.WriteLine($"{nameof(OnDialogOpened)} called.");
    }

    public void OnDialogClosed()
    {

    }

}
開いてみるとわかるのですが、ダイアログは通常の Window であることがわかります。拡大、縮小、終了のボタンなどを持ちます。ツール用のウィンドウを利用したいときは、もう少しウィンドウ自体に手を入れる必要があります。
Dialog2

まず App.xaml.cs にダイアログを追加。Dialog2 という xaml ファイルを追加して、ViewModel は Dialog1 のものを流用することにします。(仮なんで)
protected override void RegisterTypes(IContainerRegistry containerRegistry)
{
    containerRegistry.RegisterDialog<Dialog1>();
    containerRegistry.RegisterDialog<Dialog2, Dialog1ViewModel>();
}
Dialog2 の xaml はこのような感じになります。ウィンドウのスタイルをタグで指定していることがわかります。
<UserControl x:Class="PrismPopupDialogTest.Views.Dialog2"
             xmlns="http://schemas.microsoft.com/winfx/2006/xaml/presentation"
             xmlns:x="http://schemas.microsoft.com/winfx/2006/xaml"
             xmlns:d="http://schemas.microsoft.com/expression/blend/2008"
             xmlns:mc="http://schemas.openxmlformats.org/markup-compatibility/2006"
             xmlns:prism="http://prismlibrary.com/"
             xmlns:v="clr-namespace:PrismPopupDialogTest.Views"
             xmlns:vm="clr-namespace:PrismPopupDialogTest.ViewModels"
             prism:ViewModelLocator.AutoWireViewModel="True"
             mc:Ignorable="d"
             d:DesignHeight="200" d:DesignWidth="200"
             MinWidth="200" MinHeight="200">
    <prism:Dialog.WindowStyle>
        <Style TargetType="Window">
            <Setter Property="prism:Dialog.WindowStartupLocation" Value="CenterOwner" />
            <Setter Property="WindowStyle" Value="ToolWindow" />
            <Setter Property="ResizeMode" Value="NoResize"/>
            <Setter Property="ShowInTaskbar" Value="False"/>
            <Setter Property="SizeToContent" Value="WidthAndHeight"/>
        </Style>
    </prism:Dialog.WindowStyle>
    <Grid>
        <v:Dialog1 DataContext="{Binding .}" />
    </Grid>
</UserControl>
Dialog1 の中に <prism:Dialog.WindowStyle> タグを追加してもよいのですが、汎用性を考えるとこのように分離しておくとよいと思います。Grid の中で直接 Dialog1 を指定しているのが気に入らないなら、Region を利用してもよいと思います。
サンプル
GitHub にサンプルを公開しています。
")
")
